
REST Data Sources enable developers to access representational State transfer called REST Services or generic JSON data feeds and applications and use the data in Application Express components. Oracle Apex provides direct integration of REST Data Sources in classic reports, Interactive Reports, CSS calendars, and Jet Charts.

In this blog post, you will allow an external Apex instance to access your data. For this scenario, you need to have two separate Apex workspaces to execute the instructions provided in this blog. We will be using two separate Apex instances for this exercise.
The first one, which is referred to as the local instance, will run on the free Oracle Apex workspace. The workspace contains DEPT and EMP tables. The data of these two tables will be exposed via a view object to the second Apex instance, referred to as the remote instance.
The remote instance will run on the Maxapex server. We will create an interactive report on this instance to fetch and use department and employee data from the local instance.

Remote Database
I executed the following steps after configuring my remote database:
1. Accessed RESTful Services page from SQL Workshop menu.
2. Clicked the Register Schema with ORDS button to register my remote database schema
with ORDS RESTful Data Services.

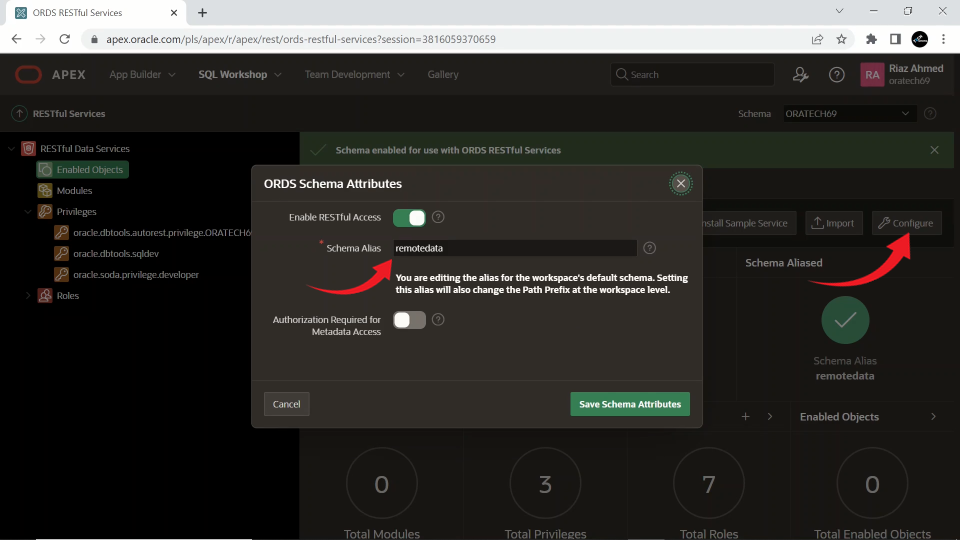
3. I have Entered Schema Alias (remotedata), select the other three options as depicted in the following screenshot, and clicked the Save Schema Attributes button. A message “Schema enabled for use with ORDS RESTful Services” appeared indicating that now I can share my schema objects remotely.

Expose Your Data to External APEX Instance
In this exercise, you will allow an external APEX instance to access your data. You need to have two separate APEX workspaces to execute the steps provided in this section.
In Workspace 1 – (Assumed as local APEX instance)
In order to execute the steps provided in this exercise, it is assumed that you have registered your schema with ORDS RESTful Data Services - for details, see the Remote Database section earlier in this blog.
1. First, create a view on a
table. In this example, I created the following view in SQL Commands to join
Emp and Dept tables:
Create view Emp_Dept as
select e.*, d.dname
from Emp e, Dept d
where e.deptno = d.deptno
2. Go to SQL Workshop | RESTful Services | Enabled Objects. Click the Create AutoREST Object button and set the following attributes. After setting the attributes click the Create button. A new row (RESTful URI) will be added to this page containing a case-sensitive URI that is used to access the REST-enabled object. Take note of the URI. The syntax of the URI is illustrated in the following figure.


In Workspace 2 – (Assumed as remote APEX instance)
1.
Go to Shared
Components | REST Data Sources Modules and click Create.
2.
On the first wizard screen, select the From Scratch option and click Next.
3.
Set attributes on the General screen, as illustrated in the following figure. Put the URI
you noted in Step 2 in the URL Endpoint
text field and click Next.

4. The Remote Server screen comes up – as
shown in the following screenshot. The first part is the Base URL of the chosen
Remote Server object. The HTTP Endpoint URL of this REST Data Source module is made up of the Base URL. The second part
is the service-specific URL Path for this REST Data Source Module. The HTTP Endpoint
URL is built by appending this to the Base URL specified in the Remote Server
object. Accepting the values on this wizard screen, click Next.

5.
We do not want to implement authentication for this new REST Data Source Module, so TURN OFF the Authentication screen and click the Discover button to see the remote data – as shown in the following
figure.

6. Click the Create REST Data Source button to complete the process.
Consuming The REST Data Source Module
In the second workspace application, which is assumed to be running in a remote APEX instance.
1. Create an Interactive Report page.
2. On the wizard's Report Source screen, select REST Data Source as the Data Source.
3. And from the respective list select the REST Data Source Module you've just created.

4. After creating the page, Expand the columns node in the left pane, which will be populated with the columns from the remote database view you created in Step 1.

5. After creation, run the interactive report page to see data from the remote database view.

For Visual Instruction Watch This Video
Performing DML Operations & View Reflection On Remote Server
In the above portion, we accessed remote data using the REST Data Source Feature of Oracle APEX.


Now, Let's test how data manipulation committed on the local server affects the interactive report on the remote server.

First, we are going to add a new employee record to the local database.

After creating a record of new employees in the local database, let's see whether it is reflected in the interactive report on the remote server. As you can see the record of the new employee is reflected automatically in the interactive report.

Now let's do some modifications to this new employee's record. Here I am changing the job type of this new record.

Refresh your browser's window. The amendment is also reflected in the interactive report.


As you can see the total number of records is fifteen, including the new employee's record.

Now refresh the page. As you can see the record is vanished. And the total number of records has also decreased by one.


