Oracle APEX 23 Course For Beginners

Oracle APEX 23 Course For Beginners

Tuesday 19 June 2012

Using JavaScript in Oracle Application Express


Incorporating JavaScript in Oracle Application Express

In Oracle APEX you use JavaScript attribute of the page to include JavaScript into your applications. This is a cgood approach for functions that are very specific to a page and a convenient way to test a function before you include it in the .js file.


You are provided the following two options to add JavaScript code to the JavaScript attribute:

Function and Global Variable Declaration - Enter JavaScript code (for example, functions or global variable declarations) for code to be used on this page (see page 111 of the book). If the code is used on multiple pages, consider putting it into an external JavaScript file to avoid duplication.

Execute When Page Loads - Enter JavaScript code to execute when the page loads. The code is executed after the JavaScript code generated by Oracle Application Express. For example, adding the following would test a function accessible from anywhere on the current page.

function test(){window.alert('This is a test.');}


On page 111 of my book "Create Rapid Web Applications Using Oracle Application Express", the first approach is used to declare a function named productPopup as shown below:
function productPopup(productID) {
  var url;
  url = 'f?p=&APP_ID.:20:&SESSION.::::P20_PRODUCT_ID:' + productID;
  html_PopUp(url,'ProductInfo',700,400,1,1);
};
 
This function is called from PL/SQL code on page 113 and 114 using the parameter productID: 
 
<a href="javascript:productPopup(''' || product_id || ''');">' || sys.htf.escape_sc(product_name) || '</a> 
and  
<a href="javascript:productPopup('''||c1.pid||''');">'||c1.i||'</a> 
 
The url variable contains the value that creates link between pages in the application. Here, it calls Page 20 of our application to display product details. P20_PRODUCT_ID is a hidden item on Page 20 (see page 123) to represent product ID. Html_PopUP is a function provided by APEX which opens a page in a popup using the specified url variable value, page name and dimensions. The complete syntax of html_popup is: html_PopUp(pURL,pName,pWidth,pHeight,pScroll,pResizable).

How it works
When you proceed to step 2 in order placement wizard, the PL/SQL code (mentioned above) creates a hyperlink for each product. Upon clicking any product link, the ID of that product is conveyed to the function “productPopup“ which, initially, creates a complete url by adding the product ID and finally displays a new popup window showing details about the selected product.

You can add multiple JavaScript functions as tested here. Make a duplicate of the above function by copying it under the existing one with the changes shown in bold as under:

function productPopup(productID) {
  var url;
  url = 'f?p=&APP_ID.:20:&SESSION.::::P20_PRODUCT_ID:' + productID;
  html_PopUp(url,'ProductInfo',700,400,1,1);
};

function productPopup2(productID) {
  var url;
  url = 'f?p=&APP_ID.:20:&SESSION.::::P20_PRODUCT_ID:' + productID;
  html_PopUp(url,'ProductInfo',1000,100,1,1);
};

In the Select Items PL/SQL under Regions, change the function name in Display Current Order section to point to the above entry:

<a href="javascript:productPopup2('''||c1.pid||''');">

Apply changes and run the page. First, click any product under the product section. You’ll see the same Product Info page that used to appear. Click the Add> link to add a product to the Current Order section. Click the product here, this time the second function productPopup2 will be called displaying product info in a page having a width of 1000 pixels.


NextPreviousHome


Sunday 17 June 2012

Web Development Using Wizard Part-1

Create Wizard-Based Order Processing Module in Oracle Application Express

Part I of IV

In chapter 6 of the book “Create Rapid Web Applications Using Oracle Application Express”, you are guided on how to create a wizard-based order placement module. This post is aimed at revealing how the order process flows. Each order passes through a sequence of steps called Order Wizard. This wizard is based on a Shared Component list created in Chapter 2 section 2.5.2 (c). The steps in the Order Wizard list are:
  1. Identify Customer
  2. Create Customer (if one doesn’t exist in the database)
  3. Select Items
  4. Show Order Summary
Order placement process is invoked through the Orders tab created in chapter 2, section 2.5.1. To remind you, tabs list available options in an Oracle APEX application and are an effective way to navigate between pages of an application. While creating the Orders tab, you set the value of Tab Current for Page to 4. This is the ID of the page to which the user navigates to when selecting this tab. In our scenario, we instructed Oracle APEX to call Page 4 - Orders Master when a user clicks this tab. The Orders Master page provides a list of all placed orders. A user can create and modify orders through this page. Rather than starting with this initial page, we are going to take the Order Wizard route to explain this chapter where a new order is generated first and modified later on.

Section 6.6 – Page 11
In section 6.6 and 6.8, two pages (Page 11 and Page 18) are created to either select an existing customer or create a new one for the order.

Section 6.6.1 – Create a blank page (Page 11). Select a page template with one level tab and a left sidebar to display application menu and to hold Order Wizard list respectively.

Section 6.6.2 – Create an HTML region named Identify Customer to hold the two items - Radio buttons and a Popup List of Values as shown in the following figure. The radio buttons offer two options to the application user to choose from. These are (a) Existing Customer and (b) New Customer. Upon selecting the Existing Customer option, the popup list item becomes active and allows user to select a customer from the provided list. If the customer is new, control of wizard transfers to Create Customer – Page 18, where user creates record for the new customer before placing order.


Section 6.6.3 – Create a List region named Order Progress (shown under) to hold Order Wizard list to the left side of the page. This region is created on every page where we need to show the Order Wizard list.


Use the Display Point attribute of the region to position it at a desirable location on the web page. This region’s Display Point is set to Page Template Region Position 2. There are 13 display points available for a region which are:
  1. After Header
  2. Page Template Body (1. items below region content)
  3. Page Template Body (2. items below region content)
  4. Page Template Body (3. items above region content)
  5. Before Footer
  6. Page Template Region Position 1
  7. Page Template Region Position 2
  8. Page Template Region Position 3
  9. Page Template Region Position 4
  10. Page Template Region Position 5
  11. Page Template Region Position 6
  12. Page Template Region Position 7
  13. Page Template Region Position 8
The following illustration shows various region display positions in a page template. 


Section 6.6.4 – Create a button named CANCEL to close this page without executing validation. Buttons can be placed in predefined region template positions or among items in a form. When you create a button in a region position, the positions you define will appear in a select list. Use the following positions for the placement of buttons in a region:

#EDIT#, #CLOSE#, #CREATE#, #CREATE2#, #EXPAND#, #HELP#, #DELETE#, #COPY#, #NEXT#, and #PREVIOUS#

You should use different available options of an attribute to check the behaviour. It's necessary if you want to learn how things work in Oracle APEX.

Section 6.6.5 – Create a button named NEXT to step forward in the wizard based on the radio button selection. Both CANCEL and NEXT buttons will be displayed in Identify Customer region (6.6.2).

Section 6.6.6 – Create the following two items on this page:
  • Create a radio group item named P11_CUSTOMER_OPTIONS in the region Identify Customer (6.6.2) and create two static options – Existing Customer and New Customer.
  • Create a Popup LOV item named P11_CUSTOMER_ID in the same region. Write a SQL statement to fetch ID and name of all customers.
Using the radio group item in Oracle APEX you can offer multiple choices to the end user to select a single option. You can enter either a SQL query or a static definition for a list of values. The following are some examples for populating radio group list:

Example 1: List of values based on SQL query
SELECT Customer_Name, Customer_ID FROM Customers ORDER by 1

Example 2: List of values with same display and return value
SELECT Customer_Name a, Customer_Name z FROM Customers ORDER BY 1

When selecting the same column for both the display and return values use a column alias.

Example 3: Static list examples
STATIC:Cow,Dog,Cat,Lion (will be sorted alphabetically)
STATIC2:10,15,20,25,50,100,200,500,1000,10000 (sorted in order of creation)
STATIC:Yes;Y,No;N (show Yes / No, return Y and N)

In our scenario, we used the last approach by creating a static list along with return values. STATIC2:Existing customer;EXISTING,New customer;NEW

In point 6 of this section, you set Source Value to EXISTING. The source of an item is based on a user preference. If the item source is null the default value is used that you set in point 7.

The Label Template, Required with help, references an asterisk image to indicate to the user that the field is required.

If Value Required is set to Yes and the page item is visible, Application Express will automatically perform a NOT NULL validation when the page is submitted. By defining a message called APEX.PAGE_ITEM_IS_REQUIRED in Shared Components/Text Messages, the predefined error text can be replaced by an application specific error text. The display location of the message is defined by the application level setting Default error display location.

We set Display Null Value to No which means that the list of values used for this item should not display a NULL value.

Section 6.6.7 – Create a PL/SQL page process under Page Rendering section to create and truncate a collection named ORDER. See Display Current Order in the post “Using HTML in PL/SQL” for details on APEX_COLLECTION.

Section 6.6.8 – Create a Dynamic Action under Page Rendering section to hide/show the LOV (P11_CUSTOMER_ID), created in step 6.6.6, based on the selection of P11_CUSTOMER_OPTIONS radio item.

Points 4 and 5 say: if the default Existing Customer option is selected from the radio group, SHOW the LOV item P11_CUSTOMER_ID. In the final step of the wizard, you select P11_CUSTOMER_ID to indicate that this is the item which will be shown or hidden depending on the selected option. You can select the name of 1 or more page items at this stage that will be affected by the action. The reverse FALSE dynamic action is created automatically by Oracle APEX which triggers when the option New Customer is selected.

Section 6.6.9 – Create an item level validation rule for P11_CUSTOMER_ID LOV to check that the item value is not null if an existing customer is to be selected i.e. the P11_CUSTOMER_OPTIONS is set to EXISTING.

Section 6.6.10 – Create three branches to move ahead or step back accordingly when the NEXT or CANCEL buttons are clicked. In the first branch, enter 12 in page value to call this page only when an existing customer is selected and the NEXT button is clicked. In the second branch, set page value to 18 to first create a new customer record and then move ahead in the sequence to place order. In the final branch, set the page value to 4 to move back to Order Master page when the CANCEL button is clicked. 

Section 6.8 – Page 18
This exercise creates record for a customer which doesn’t exist in the database. In chapter 4 of this book, you’ve already done this exercise. So, to preserve time and to learn how existing pages are re-used in Oracle APEX, you are taught how a new page is created as a copy of an existing one in this section.


Section 6.8.1 – Create a new page based on Page 7 (Customer Details). Set the new page number to 18. Select a page template with one level tab to display application menu along with two sidebars to hold Order Wizard list to the left side and an HTML region to the right to display some static help text about the page.

Section 6.8.2 – Set template and display point for Customer Details region. Use the flashlight icon to see the page layout and select a position. 

Section 6.8.3 – Delete the unwanted region Orders for this customer, which displays existing orders for the selected customer. Because this information is not available for new customers, therefore, we removed it.

Section 6.8.4 – Create a List region named Order Progress to hold Order Wizard list similar to 6.6.3.

Section 6.8.5 – Move back to Page 4 – Order Master when CANCEL button is clicked.

Section 6.8.6 – Remove the customer deletion process and the corresponding DELETE button because you only want to create a new customer record.

Section 6.8.7 – Create two new buttons - PREVIOUS and INSERT. The PREVIOUS button would take you back to Page 11 when you click the CANCEL button while clicking the INSERT button (labeled Next >) first inserts the new customer’s record into the database using SQL Insert action in Database Action under Action When Button Clicked, and then passes the flow to the next step to select order items.

Section 6.8.8 – Modify the two default processes created by Oracle APEX under Page Processing section. The first one, Process Row of DEMO_CUSTOMERS is an automatic row processing (DML) process which after performing a SQL INSERT statement, takes the first (or only) column of the primary key and returns it into the selected item i.e. P18_CUSTOMER_ID.

The process, Row of DEMO_CUSTOMERS offers three functions. First, you are not required to provide any SQL coding. Second, Oracle Application Express performs DML processing for you. Third, this process automatically performs lost update detection. Lost update detection ensures data integrity in applications where data can be accessed concurrently.

The Reset Page process clears cache for all items on the page when the PREVIOUS button is clicked.

The NEVER Condition Type is used to temporarily prevent controls or components from being rendered on a page, or to prevent processes, computations and validations from running.

Section 6.8.9 – A branch is an instruction to go to a specific page, procedure, or URL. Here, you’re instructing to go to Page 12 – Enter New Order when the NEXT button is clicked.


PreviousHome


Saturday 16 June 2012

Web Development Using Wizard Part-2

Create Wizard-Based Order Processing Module in Oracle Application Express 


Part II of IV

Section 6.10 – Page 12


After selecting an existing customer or creating a new one, the next step in the Order Wizard is to add items to the order. In this section, you learn many techniques about how to display products and add them to the cart like the ones available on the web.


Section 6.10.1 – On this page the following tasks are performed:
a.       Page template set similar to Page 18.
b.      Added a function productPopup in JavaScript section to display product details in a popup window. This technique demonstrates how a page is displayed within a web page in Oracle APEX.
c.       Added Cascading Style Sheet (CSS) in HTML header section to position and style page elements. Check out this blog post which shows How to Use CSS in Oracle APEX.

Section 6.10.2 – In this section a PL/SQL Dynamic Content region is created to display the following information:
a.       Customer information: This region displays name and other details of the selected customer.
b.      Products: Displays all products from the products table.
c.       Current order: This area hold items selected in the current order along with price, quantity, and totals.


Section 6.10.3 – Create a List region named Order Progress to hold Order Wizard list similar to 6.6.3 and 6.8.4.

Section 6.10.4 – Create three buttons CANCEL, PLACE ORDER and PREVIOUS. For the Place Order button, select a condition type Exists (SQL query returns at least one row) and type select 1 from apex_collections where collection_name = 'ORDER'. This condition ensures that the current order has at least one item selected to proceed further. Also note that the button Place Order becomes visible only after adding a product to the Current Order pane. See Display Current Order in the post “Using HTML in PL/SQL” for details on APEX_COLLECTION.

Section 6.10.5 – This section demonstrates the use of hidden items in Oracle APEX. The first hidden item, P12_PRODUCT_ID, is created and used in subsequent sections to Add/Remove members from Apex_Collections. The other one, P12_CUSTOMER_NAME, is used in the following computation section. You also set the attribute Value Protected to No. Specifying Yes will prevent the hidden value from being manipulated when the page is posted.

Section 6.10.6 – A computation section is created under Page Rendering to display complete customer name. It is merely added to the application to show the use of computation in Oracle APEX. The actual customer profile is displayed on the page using PL/SQL code Display Customer Information under section 6.10.2 in conjunction with CSS.

Section 6.10.7 – This section comprises two PL/SQL processes Add product to the order collection and Remove product from the order collection based on P12_PRODUCT_ID defined in section 6.10.5. The referenced collection name ORDER was created in Page 11 - section 6.6.7. Condition Types are set to ADD and REMOVE respectively. These two expressions refer to the ADD and REMOVE requests sent through the <a> tag in Display Products PL/SQL block under section 6.10.2 (see page 113/114 in the book). After receiving the request, the appropriate process is run to ADD/REMOVE product to/from the Current Order section.

Section 6.10.8 – Place Order is the final process in this page that is invoked when Place Order button is pressed. This PL/SQL block writes data to relevant database tables using page items and Order collection. The collection ORDER is truncated after the data is inserted using the statement: apex_collection.truncate_collection(p_collection_name => 'ORDER');

Section 6.10.9 – Create two branches in this page one each for Place Order and Cancel buttons. When the Place Order button is clicked, the wizard switches forward to Order Summary page (Page 14) and moves back to Order Master page (Page 4) when the Cancel button is pressed.


Section 6.12 – Page 20
In order to provide product details to the user before placing orders, you create a popup page that open within the existing order page to display product's image, description, category, and price. A popup window doesn’t need to have either a breadcrumb or a tab associated to it; therefore, none of these options were selected during the page creation wizard.


Section 6.12.1 – Modify attribute of the newly created page and set template to Popup to open it in an existing one.

Section 6.12.2 – Create a SQL Report region to hold product image. Using a SQL statement fetch the image of the selected product based on P20_PRODUCT_ID (a hidden page item created in section 6.12.5). Following is the SQL statement and explanation of the few Oracle expressions used in it:

select decode(nvl(dbms_lob.getlength(product_image),0),0,null,'<img src="'||apex_util.get_blob_file_src('P6_PRODUCT_IMAGE',product_id)||'" />') image
from demo_product_info
where product_id = :P20_PRODUCT_ID

DECODE Function: In Oracle/PLSQL, the decode function has the functionality of an IF-THEN-ELSE statement. It compares expression to each search value one by one. If the exprssion is equal to a search, then Oracle Database returns the corresponding result. If no match is found, then Oracle returns default. If default is omitted, then Oracle returns null. In the above statement, the Decode function assesses if the returned value of product image is zero, store null to the result. The following syntax and example of the Decode function elaborates it further.

Decode Syntax:
decode( expression , search , result [, search , result]... [, default] )

Example of Decode Function:
    Select customer_name,
    decode(customer_id,1,'A',2,'B',3,'C','D') result
    From customers;

The IF-THEN-ELSE statement for the above Decode function would be:
    IF customer_id = 1 THEN
         result := 'A';
    ELSIF customer_id = 2 THEN
        result := 'B';
    ELSIF customer_id = 3 THEN
        result := 'C';
    ELSE
        result := 'D';
    END IF;

NVL Function:
In Oracle/PLSQL, the NVL function lets you substitute a value when a null value is encountered. The syntax for the NVL function is:
NVL( string1, replace_with )

Example of NVL Function:
Select NVL(customer_state, 'N/A') from customers;

The NVL function in the above statement evaluates that if the customer_state column is not null return the value it contains. Otherwise, return the ‘N/A’ string.

DBMS_LOB Package: LOBs, or Large OBjects, are Oracle's preferred way of handling and storing non-character data, such as mp3s, videos, pictures, etc., and long character data. Binary large objects, or BLOBs, and character large objects, or CLOBs, can store up to terabytes of data - much more than the paltry 4000 bytes permitted in a varchar2 column.

GETLENGTH(): It is a PL/SQL Functions of the DBMS_LOB package to read or examine internal and external LOB values and get the length of the LOB value. Type the following SQL statement in SQL Plus or another utility:

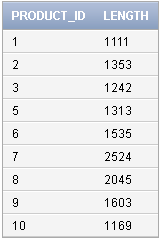
Select product_id, dbms_lob.getlength(product_image) Length from demo_product_info order by product_id;

Output of DBMS_LOB.GETLENGTH Function:


IMG and SRC: In HTML, images are defined with the <img> tag. The <img> tag has no closing tag. To display an image on a page, you need to use the src attribute. Src stands for "source". The value of the src attribute is the URL of the image you want to display.

Syntax for defining an image:
<img src="url" alt="some_text"/>

The URL points to the location where the image is stored.

APEX_UTIL.GET_BLOG_FILE_SRC: See section 6.4.2 in Part IV of this blog post.

Section 6.12.3 – Create another SQL Report region to display product’s text information (name, description, category, and list price).

Section 6.12.4 – Create a button in the popup page to allow user to close it. The javascript:window.close() method is used to give a close link in the popup you created. The close method closes only windows opened by JavaScript.

Section 6.12.5 – Create a hidden item named P20_PRODUCT_ID to act as a parameter for the SQL queries mentioned in the preceding sections.


PreviousHome


Friday 15 June 2012

Web Development Using Wizard Part-3


Create Wizard-Based Order Processing Module in Oracle Application Express

Part III of IV

Section 6.14 – Page 14


After selecting order items, this page is created to show summary of the current order. It would display Order Number, Customer and Order Line details.


Step 6.14.1 – The page must show one level tab and a left sidebar for Order Wizard list.

Step 6.14.2 – Added a main HTML region named Order Summary to hold summarized data and two buttons (View Orders and Home).

Step 6.14.3 – Added a second region based on PL/SQL Dynamic Content to hold Order Number and Customer information. Here we used CSS within the PL/SQL block to style the Order number.


Step 6.14.4 – This is a report region. The data it contains comes through a SQL statement from Order Item and Product tables to show line items on the summary page.

Step 6.14.5 – Create a List region (Order Progress) to hold Order Wizard list similar to sections 6.6.3, 6.8.4 and 6.10.3.

Step 6.14.6 – Create the two buttons (View Orders and Home) as mentioned earlier. Action for the former one is set to Redirect to Page in this Application and the corresponding page value to 4. Clicking this button takes user to the main Orders page. Similarly, the Home button is set to switch the application control to Page 1.

Step 6.14.7 – Create a hidden item (P14_ORDER_ID) to act as a parameter for the SQL queries mentioned in the preceding sections. Note: On the book’s page number 128, this item is erroneously typed as P14_PRODUCT_ID which should be P14_ORDER_ID.


Display Data Dynamically In A Gauge Chart

In this tutorial, we will learn how to display customer's ordered data in a gauge chart dynamically. As you choose a customer name from ...