
The global page is a new feature incorporated in Oracle Application Express and functions as a master page in your application. You can define a separate Global Page, Login Page, and Home Page for each user interface. This facilitates different pages being shown to end users when they access the application from a mobile device as opposed to a desktop system. The Application Express engine renders all components you add to a Global page on every page within your application. You can further control whether the Application Express engine renders a component or runs a computation, validation, or process by defining conditions. In this book, you'll use two separate global pages for desktop and mobile interfaces. In a desktop application, it is used in the reports module to display a list of reports on every report page. In the mobile interface, however, it is used to display footer controls on every mobile page. You can also add CSS code to style your application pages, as you'll we will do by adding cascading rules to the global page to style the mobile shopping cart.
Create Global Page for Desktop Web Application
Prior to creating reports, you will create the reports menu. This menu will be displayed to the left on all report pages. In order to achieve this task, you need to create a Global Page. Global Page components are displayed on all pages if their region's display point is contained within the selected page template. Conditional Display attributes can be used to suppress the display. This is a very simple and effective way of sharing APEX objects throughout the application. In this exercise, you will create a Global Page for your application to display the Reports List. Since Global Page components are shared across the application, you are going to put a condition to display the reports list only on pages related to the Reports tab.

Creating Reports List for Desktop Application
This list contains six links (shown in the above figure) that lead to different graphical reports in our desktop application and appears on all pages associated with the Reports tab.
1. Go to Shared Components | Navigation Section | Lists | and click the Create button.
2. Select From Scratch. Enter Reports List for Name, select Static as the list Type, and click Next.
3. Enter the following values in the Query or Static Values page. Here, you're defining a label and the target page id, the user will be taken to. For example, when a user clicks Customer Orders, he/she will land on Page 17.
List Entry Label Target Page ID or Custom URL
Customer Orders 17
Sales by Category and Product 16
Sales by Category / Month 5
Order Calendar 10
Customer Map 15
Product Order Tree 19
4. Click Next, accept the default values in the next screen, and click the Create List button. The wizard allowed you to create five entries. The sixth one - Product Order Tree - will be created like this:
5. In the main Lists interface, click the newly created Reports List icon.

6. Click the button: Create List Entry.
7. Enter Product Order Tree in List Entry Label.
8. Enter 19 in the Page attribute under the Target section and click the Create List Entry button. That’s it. Your Reports List should look like the following figure where each entry appears as a link. Now that you've created the list, it's time to create a global page to place the list.

Desktop Application Global Page
Follow the steps mentioned below to create a global page for a desktop application.
1. Click the Create Page button.
2. Click on the Global Page icon.
3. Enter 100 in the Page Number and click Finish. Global Page definitions should appear.
4. Click Create in the Regions section to create a new region.
5. Select the List option.
6. Enter Reports in Title, set Template to Standard Region, Display Point to Page Template Body (3), and click Next.
7. Set List to Reports List and List Template to Vertical Sidebar List.
8. Set Condition Type to Current Page Is Contained Within Expression 1 (comma delimited list of pages) and enter 5,10,15,16,17,19 in Expression 1 and click the Create Region button. The Expression 1 attributes specify the six report pages. When you call these reports (under the Reports tab), the condition evaluates to true and displays the Reports List on the page.
9. Modify the region and set Grid Layout attributes as follows. These attributes will place the Reports List on a new row starting at column number 1. The value "Automatic" in the Column Span attribute automatically controls the list display width.
Start New Row: Yes
Column: 1
Column Span: Automatic
Once you create the pages specified in the Reports List (taught in Chapter 8 - Graphic Reports), you'll see the list appearing to the left on every report page as illustrated below:

Create Footer Control List for Mobile Application
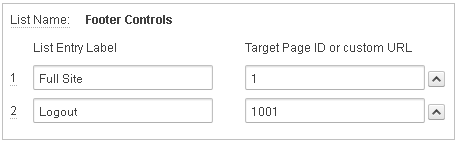
This static list carries two options (Full Site and Logout) and will be displayed at the bottom in the Footer Controls region. The first option will take you to the Home page of the desktop version, while the second one will log you out of the mobile application and will show the mobile login page. Here are the steps to create the static list to be incorporated into the mobile application.
1. Go to Shared Components.
2. In the Navigation section, click the List link.
3. Click the Create button to create a new list.
4. Select the option From Scratch.
5. Enter Footer Controls in Name and select Static as Type.
6. Fill in the Static Values as shown below:
7. Click Create List.
Utilize Shared Component List on a Global Page
The list, created above, is displayed on every mobile application page by creating a region on a global page like this:
1. Call the mobile Global Page (Page 1001).
2. Click the Create button in the Regions section.
3. Select the List option.
4. In the Display Attributes page, enter Footer Controls in Title, select Footer Toolbar (Fixed) for Region Template, Page Template Body (3) for Display Point, and enter 30 in Sequence. Click Next.
5. In the Source page, select Footer Controls as List and Button Control Group as List Template.
6. For Condition Type, select Current Page Is Not in Expression 1 and enter 1001 in Expression 1 to suppress the appearance of footer controls on the login page.
7. Click Create Region.
8. Edit this region. Scroll down to the Attributes section and enter style="text-align:center" for Region Attributes box. This inline CSS style rule will bring the list (being shown as a button control group) to the center of the page.
9. Apply Changes.
The list would appear at the bottom of the mobile application as a button control group just like this:

Using Global Page to Style Web Application Pages
You can also use APEX global page to add styles to all or specific application pages by putting CSS code. For this purpose, you need to create a separate region on the global page. In the following exercise, you'll add CSS rules to style the shopping cart page.
1. Create another region on the mobile global page.
2. Select HTML as the type of region.
3. Select HTML as a region container.
4. In the Display Attributes page, enter Mobile Styles in Title, select No Template for Region Template, Page Template Body (3) for Display Point, and enter 40 in Sequence. Click Next.
5. In Region Source, enter the style sheet defined below and create the region. Note that these rules were created and described earlier in the desktop version to style the Select Items page (Page 12), and were defined in the inline page attribute. Here, you added it to the global page to test another approach to style the Select Items page (Page 217) of the mobile version. Since the classes defined in these rules are referenced only by Page 217, other pages in the application will not be affected.
<style>
div.CustomerInfo strong{font:bold 12px/16px Arial,sans-serif;display:block;width:120px;}
div.CustomerInfo p{display:block;margin:0; font: normal 12px/16px Arial, sans-serif;}
div.Products{clear:both;margin:16px 0 0 0;padding:0 8px 0 0;}
div.Products table{border:1px solid #CCC;border-bottom:none;}
div.Products table th{background-color:#DDD;color:#000;font:bold 12px/16px Arial,sans-serif;padding:4px 10px;text-align:right;border-bottom:1px solid #CCC;}
div.Products table td{border-bottom:1px solid #CCC;font:normal 12px/16px Arial,sans-serif;padding:4px 10px;text-align:right;}
div.Products table td a{color:#000;}
div.Products .left{text-align:left;}
div.CartItem{padding:8px 8px 0 8px;font:normal 11px/14px Arial,sans-serif;}
div.CartItem a{color:#000;}
div.CartItem span{display:block;text-align:right;padding:8px 0 0 0;}
div.CartItem span.subtotal{font-weight:bold;}
div.CartTotal{border-top:1px solid #FFF;margin-top:8px;padding:8px;border-top:1px dotted #AAA;}
div.CartTotal span{display:block;text-align:right;font:normal 11px/14px Arial,sans-serif;padding:0 0 4px 0;}
div.CartTotal p{padding:0;margin:0;font:normal 11px/14px Arial,sans-serif;position:relative;}
div.CartTotal p.CartTotal{font:bold 12px/14px Arial,sans-serif;padding:8px 0 0 0;}
div.CartTotal p.CartTotal span{font:bold 12px/14px Arial,sans-serif;padding:8px 0 0 0;}
div.CartTotal p span{padding:0;position:absolute;right:0;top:0;}
</style>
The order entry form page of the mobile web application would be presented as illustrated in the following figure:


