An excerpt from the book Create Rapid Web Applications Using Oracle Application Express - Second Edition
Follow the steps mentioned below to create a blank structure of a web application in Oracle Application Express. These instructions will create two application page: Home and Login.
1. Login to the APEX development environment by entering http://localhost:8080/apex or http://127.0.0.1:8080/apex or http://yourcomputerIP:8080/apex in your browser. The localhost parameter specifies the server running your database. Since we have the database on the same machine, we'll set this parameter to localhost. In computer networking, localhost (meaning this computer) is the standard hostname given to the address of the loopback network interface. This mechanism is useful for programmers to test their software during development.
2. Enter ASA for Workspace, Admin for Username, the case-sensitive password (asa) that you set in step 8 in the previous section, and click the login to Application Express button. Once again, you’ll be asked to change the admin user password. Do so as you did before. To follow the password complexity rules, put a strong password for example: Manager_2013. Click the Return button after successfully changing the password and login to the develop environment with the new password.
3. Click the Application Builder icon.
4. In the Application Builder page, click the Create button to create a new application.
5. Click the Database icon.
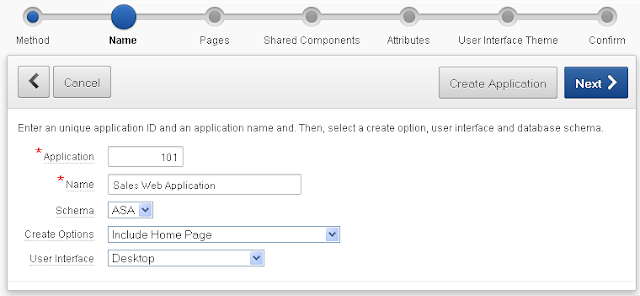
6. Enter Sales Web Application in the Name box and match other attribute values with those set in the following figure. Click Next.
7. Accepting default values in the “Pages” page, click Next to move on.
8. In Shared Components Page, select No for Copy Shared Components from Another Application and click Next.
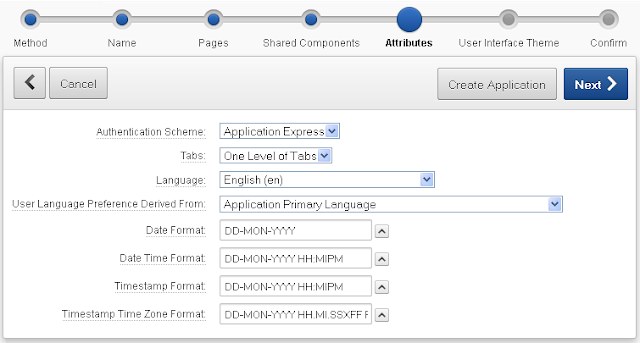
9. In the Attributes page, set Date and Time formats using the adjacent LOV buttons. Accept default values for Authentication Scheme and other attributes as shown in the figure below. Oracle APEX provides a number of predefined authentication mechanisms, including a built-in authentication framework and an extensible custom framework. In the selected default scheme (Application Express Accounts) users are managed and maintained in the APEX workspace. Note that in a subsequent section we will replace the default Application Express Authentication Scheme with custom authentication for this application. For the time being, click Next to proceed.
10. For User Interface Theme, select Blue Responsive (Theme 25) and click Next.
11. Click the Create Application button in the confirm page. Your screen should resemble the following figure. Note that APEX created the application with two pages, Page 1 (Home) and Page 101 (Login). This main application interface can be viewed differently using the three buttons: icon, report and detail. By default, the page (as shown in the figure below) is presented in report view with relevant details.
12. Click the Run Application icon. Type admin and Manager_2013 for username and password, respectively. Click the Login button. You’ll see the Home page of your application (as illustrated below) displaying the currently logged in user (admin) along with the Logout link. Click the Logout link and then the Application 101 link at the bottom of your screen to move back to the development environment.
An excerpt from the book Create Rapid Web Applications Using Oracle Application Express - Second Edition


