

Create Sales Order Application in Oracle Application Express

In order to keep the practice momentum of this practical Oracle APEX book (Create Rapid Web Applications Using Oracle Application Express) and to leave something for users to think over, I intentionally left aside the explanation area that is a crucial part of any technology book to provide details about how things actually work.
The purpose of this blog is to bridge that gap by providing
explanations of each section of the book. I’ll try to guide you on every aspect
that I feel necessary, but, will be grateful to receive your opinion as well
about any area that you deem requires enlightenment.
To start with, I’ve chosen Chapter 6 (Place Orders) first, because,
it is the lengthiest chapter among all others and has some advanced topics that
the intended audience of this book (novices) would be eager to learn.
Chapter’s Recap:
You
create professional-looking web pages to take orders from customers and create
seven pages to complete this process in a sequence through a wizard-like
approach. The first form will allow the user to select an existing customer or
create a new one. In the second step, the user will select products to order and
the last step will show a summary of the placed order. Once an order is created,
you can view, modify, and delete it through the Order Details page using the
edit icon on the orders’ main page. A couple of other pages will be created as well to create a new customer, if one does
not exist, and to display product information such as Description, Category, and
Price. Following are the details of the pages that are created in this chapter:
Page No.
|
Page Name
|
Purpose
|
4
|
Orders
|
Main page to display all existing orders
|
29
|
Order
Details
|
Display
complete order with details
|
11
|
New Order – Identify Customer (Step 1a)
|
Select an existing customer
|
18
|
New
Order – Create Customer (Step 1b)
|
If
customer does not exist, create his/her account
|
12
|
New Order – Select Items (Step 2)
|
Add products to the order
|
20
|
Product
Info
|
Show
details of a product in a popup window
|
14
|
Order Summary (Step 3)
|
Show summary of the placed order
|
Before starting the proceedings, let’s acquaint ourselves with the following terms used in this chapter:
About Cascading Style Sheets (CSS)
A cascading style sheet (CSS) provides a way to control the style
of a Web page without changing its structure. When used properly, CSS
separates visual attributes such as color, margins, and fonts from the
structure of the HTML document. Go through free CSS tutorials at http://www.w3schools.com/ .
In this chapter, we used CSS on page 112 to style Page-12 (Select
Items-Figure 6-19). On this page, we used class attributes in PL/SQL code and
referenced them in CSS in the HTML Header section. Before moving on to understand
the actual functionality, let’s first take a look at a simple example of how to
use class attributes in an HTML document. The class attribute is mostly used to
point to a class in a style sheet. The syntax is <element
class="classname">.
<html>
<head>
<style
type="text/css">
h1.header {color:blue;}
p.styledpara
{color:red;}
</style>
</head>
<body>
<h1
class="header">Class Referenced in CSS</h1>
<p>A normal paragraph.</p>
<p class="styledpara">Note
that this is an important paragraph.</p>
</body>
</html>
The body of this page contains three sections:
- <h1 class="header">Class Referenced in CSS</h1>. The text, “Class Referenced in CSS”, is enclosed in h1 HTML tag. It is called a level 1 heading and is the most important header in a document; it is usually used to indicate the title of the document. The text is preceded by a class, named “header”. Considering the above class syntax, here, h1 is the element and the header is the classname. Combined together (element.classname), this class is referenced in the style section using a CSS rule – h1.header {color:blue;} to present the heading in blue color. A CSS rule has two main parts: a selector, and one or more declarations. The selector is normally the HTML element you want to style. Each declaration consists of a property and a value. The property is the style attribute you want to change. Each property has a value. In the above h1.header {color:blue;} rule, h1 is the selector followed by the classname and {color:blue;} is the declaration.
- <p>A normal paragraph.</p> – A plain paragraph without any style applied to it. HTML documents are divided into paragraphs and paragraphs are defined with the <p> tag. <p> is called the start tag or opening tag while </p> is called the end or closing tag.
- <p class="styledpara">Note that this is an important paragraph.</p>. A paragraph with a class named “styledpara”. In the style section, the selector “p” followed by the classname “styledpara” having declaration{ color:red;} is referencing this section to present the paragraph text in red color.
Now that you have understood how CSS is used in web pages, let’s
get back to figuring out how we used it on page 12. Turn to page 113. There is a
class named demoCustomerInfo defined in the PL/SQL Dynamic Content on this
page. Here is the listing:
Line 1. <div
class="demoCustomerInfo">
Line 2. <strong>Customer:</strong>
Line 3. <p>
Line 4. cust_first_name + cust_last_name)
Line 5. cust_street_address1
Line 6. cust_street_address2)
Line 7. cust_city
+ cust_state
Line 8. cust_postal_code
Line 9. </p>
Line 10.</div>
This code displays the heading “Customer:” along with details of
the selected customer as shown in Figure 6-19.

Figure 6-19 (A:sideCartItem B:sideCartTotal C:demoCustomerInfo D:demoProducts E:demoCurrentOrder F:demoTitle G:demoAddtoCart)
Now check the corresponding CSS code in the HTML Header section on page 112.
div.demoCustomerInfo strong{font:bold 12px/16px
Arial,sansserif;display:block;float:left;width:120px;}
div.demoCustomerInfo p{display:block;float:left;margin:0;
font: normal 12px/16px Arial,sans-serif;}
The first rule has the selector strong which styles the
title “Customer:” on Line 2 whereas the second one with the p selector is
used to style the values between tags <p></p> - Line 4 through Line
8.
Let’s play with the above two CSS rules and note the effect on our
web page. In this exercise, you will move the customer’s information to the far right
side.
1.
Log in to the application
2.
Click the Orders tab
3.
Click Enter New Order button
4.
Select an Existing customer
5.
On the Select Items page, click the button
Edit Page 12 at the bottom of your screen
6.
Click Edit in the Page section
7.
Scroll down to HTML Header and Body
Attribute section, locate the above two rules and change/add the properties
shown in bold:
div.demoCustomerInfo strong{font:bold 18px/16px
Arial,sans-serif;display:block;float:left;width:0px;padding-left:480px;}
div.demoCustomerInfo p{display:block;float:right;margin:0;
font: normal 12px/16px Arial, sans-serif;}
8.
Apply changes and click Run. The
Customer font increased from 12px to 18px. We added a property padding-left
with a value of 480px. This will create a space of 480px from the left side and
will show the title on the far right. Similarly, to show the customer’s details on
the right location we changed the float property from left to right. The width
property in the previous rule was set to 120px to create a space between the
title “Customer:” and the name of the customer. We set it to zero because we do
not need that space now.
Using Cascading Style Sheet (CSS) in Oracle Application Express
This section explains CSS used in chapter
6, page 112. As mentioned earlier, CSS provides a way to control the style of a Web page without
changing its structure. We used it on Page 12 of our application to present the
page’s contents in the desired format. On Page 12, you select items for your
order which is the second step in the order processing wizard. Following are the CSS
rules – explained individually.
<style
type="text/css" media="all">
The
<style></style> tag is used to define style information for an HTML
document. Inside the <style> element you specify how HTML elements should
render in a browser. The required type attribute defines the content of
the <style> element. The only possible value is "text/css". The
<style> element always goes inside the head section.
Media
Types allow you to specify how documents will be presented in different media.
The document can be displayed differently on the screen, on paper, with an
aural browser, etc. In this example media attribute is set to all, specifying
that this style sheet is intended for all devices. Media types include print,
screen, projection, aural, braille, projection, embossed, handheld, tty, and
tv.
SIDECARTITEM CLASS:
div.sideCartItem{padding:8px
8px 0 8px;font:normal 11px/14px Arial,sans-serif;}
The div element represents the
corresponding <div> HTML tag on page 114 <div
class=”sideCartItem”>. The .class selector styles all elements
with the specified class. This rule styles all <div> elements with
class="sideCartItem". You can read the text as style the div elements
of the class sideCartItem by setting values to the properties mentioned within
the braces. Styling parameters are passed within braces. The first property you
set here is padding. You set top, right, bottom, and left values as 8px, 8px,
0px, and 8px respectively.

To understand the function of padding, change all the values to 50px, save the modifications and run the page. The result, similar to the right pane in the above figure will be shown. Padding of 50px has been applied to all four sides. The main difference between Padding and Margin is: Padding is the space inside the border between the border and the actual image or cell contents while Margins are the spaces outside the border, between the border and the other elements next to this object.
In the next parameter,
you set font size, weight, and family properties in one declaration.
div.sideCartItem
a{color:#000;}
This rule is applied to set the color of the Product
Name in the Current Order section. The letter [a] before the opening brace
corresponds to the HTML link tag <a> on page 114 – <a
href="javascript:productPopup('''||c1.pid||''');">'||c1.i||'</a>. Change the value #000 to #0050C0
and see the following result. See http://www.w3schools.com/html/html_colors.asp for more details on HTML colors.

div.sideCartItem
span{display:block;text-align:right;padding:4px 0 0 0;}
div.sideCartItem
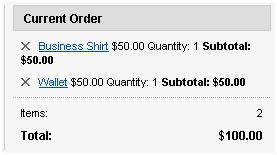
span.subtotal{font-weight:bold;}
These rules are created to show Price,
Quantity, and Subtotal in the desired format. Span elements refer to the <span>
tags on page 114 and are used to group inline elements in a document.
<span>'||trim(to_char(c1.p,'$999G999G999D00'))||'</span>
<span>Quantity:
'||c1.q||'</span>
<span class="subtotal">Subtotal:
'||trim(to_char(c1.ep,'$999G999G999D00'))||'</span>
The display property defines how a certain HTML element should be
displayed. We used the block value in which the element is displayed as a block
element (like paragraphs and headers). The top value of the padding property is set to 4px to define height among Price,
Quantity, and Subtotal. Change this value to 8px and note the difference as
shown in the following figure.

The second rule has a sub-class named subtotal to show all sub-total labels and values in bold.
Comment out the first rule using -- at
the beginning. Apply changes and run the order form. You’ll see the following
output. Here the values are shown as inline elements (default) without any line
break. Deactivate the other rule to show the subtotal label and value in normal
weight.
Rule 1 deactivated
|

Both rules deactivated
|
SIDECARTTOTAL CLASS:
div.sideCartTotal{margin-top:8px;padding:8px;border-top:1px
dotted #AAA;}
This rule draws a separating line under
the subtotal section using the border-top property. The top margin of 8px specifies the
height between the subtotal and the separating line while padding sets the height
between the separating line and the number of items as shown in the following
figure.

div.sideCartTotal p{padding:0;margin:0;font:normal 11px/14px Arial,sans-serif;position:relative;}
If disabled, Item and Total values will
not appear. The [p] element points towards the <p> tag in the PL/SQL
code. The rule applies to both values since both are enclosed in the <p>
tag:
<p>Items:
<span>'||c||'</span></p>
<p
class="sideCartTotal">Total:
<span>'||trim(to_char(t,'$999G999G999D00'))||'</span></p>
div.sideCartTotal
p.sideCartTotal{font:bold 12px/14px Arial,sans-serif;padding:8px 0 0 0;}
This rule applies to the label “Total:”
which is enclosed in the <p> tag followed by the class sideCartTotal - <p
class="sideCartTotal">Total:
div.sideCartTotal
p.sideCartTotal span{font:bold 12px/14px Arial,sans-serif;padding:8px 0 0 0;}
Formats the <span> tag part in the
PL/SQL code (as shown below) which contains the total order value. <span>'||trim(to_char(t,'$999G999G999D00'))||'</span>
div.sideCartTotal
p span{padding:0;position:absolute;right:0;top:0;}
The rule applied to position Items and Total values. Please note
that both these values are enclosed in the <span> tag in PL/SQL code - <span>'||c||'</span>
and <span>'||trim(to_char(t,'$999G999G999D00'))||'</span>. With
absolute positioning, an element can be placed anywhere on a page. Let’s see a
small demo to understand absolute positioning. Suppose you want to show both
these values immediately after the corresponding captions as shown in the
following figure. To do this, replace the right:0 property with left:30px; as shown
here: position:absolute;left:30px;top:0; The values will be placed 30px
from the left.

DEMOCUSTOMERINFO CLASS:
div.demoCustomerInfo
strong{font:bold 12px/16px
Arial,sans-serif;display:block;float:left;width:120px;}
This rule refers to the PL/SQL code
<strong>Customer:</strong> to display the label “Customer:” in
bold. The width property, which is set to 120px, determines the distance
between the label Customer: and the name of the customer selected for the
order. Set this value to 60px to have the name appear adjacent to the label as
shown here:

div.demoCustomerInfo p{display:block;float:left;margin:0; font: normal 12px/16px Arial, sans-serif;}
This rule applies to the <p> tag
and displays all column values within the tag in a block as shown in the above
figure.
htp.p('<p>');
htp.p(htf.escape_sc(x.cust_first_name)
|| ' ' || htf.escape_sc(x.cust_last_name) || '<br />');
htp.p(sys.htf.escape_sc(x.cust_street_address1)
|| '<br />');
if
x.cust_street_address2 is not null then
sys.htp.p(sys.htf.escape_sc(x.cust_street_address2)
|| '<br />');
end if;
htp.p(sys.htf.escape_sc(x.cust_city)
|| ', ' || x.cust_state || ' ' ||
htf.escape_sc(x.cust_postal_code) || '<br />');
htp.p('</p>');
DEMOPRODUCTS CLASS:
div.demoProducts{clear:both;float:left;width:58%;margin:16px
0 0 0;padding:0 8px 0 0;}
The clear property specifies which sides
of an element are where other floating elements are not allowed. We used the value
BOTH which means no floating elements are allowed on the left or the right side.
Let’s do some experiments with this property. Change the value of the clear
property to the default none to allow floating. Apply changes and run the application. This is what
you’ll see:

The width property sets the width of an element. In this case, it is the table comprising the Product Name, Price, and Add to Cart button. Change the value from 58% to 40% and then to 70% and note the changes. When you set the width value to 40% the table shrinks and expands when the value is set to 70%. The 16px top margin sets the distance between cust_postal_code and table headings while the 8px right margin is used to create a space between the table and the vertical bar separating the Products and Current Order sections. Set both these values to 0px and observe the change.
div.demoProducts
table{border:1px solid #CCC;border-bottom:none;}
This rule sets the top, left, and right
borders of the table leaving the bottom. To see the effect, change the border
value to 3px.
div.demoProducts
table th{background-color:#DDD;color:#000;font:bold 12px/16px
Arial,sans-serif;padding:4px 10px;text-align:right;border-bottom:1px solid
#CCC;}
This rule is created to format table’s
header cells <th> (Product, Price, and Add to Cart).
<th class=”left”>
Product</th><th>Price</th><th>Add to Cart</th>
Note that we declared class=”left” for
the title Product to left-align it. In the above rule, we set text-align:right
for all <th> values. We used the class=”left” declaration to specifically
align the Product heading towards the left side (the rule for .left is coming
ahead). The padding value of 4px determines the heading row height, while the
10px value sets the left/right margins. Set both the values to 10px and 0px
respectively and see the effect.
div.demoProducts
table td{border-bottom:1px solid #CCC;font:normal 12px/16px
Arial,sans-serif;padding:4px 10px;text-align:right;}
This rule is created for Standard Cell
<td> of the table which contains data. The first property border-bottom:1px creates a horizontal line between
the two rows in the table. Set this value to 0px to remove the bottom border.
<td
class="left">'||c1.product_name||'</td>
<td>'||trim(to_char(c1.list_price,'999G999G990D00'))||'</td>
<td><a href="f?p=&APP_ID.:12:'||:app_session||':ADD:::P12_PRODUCT_ID:'||c1.product_id||'"class="demoAddtoCart">Add
></a></td>
div.demoProducts
table td a{color:#000;}
Sets font color of an anchored element in
table data i.e. Product and Add>.
div.demoProducts
.left{text-align:left;}
A sub-class to left-align corresponding
text. Used in the following PL/SQL code.
<th class=”left”>
Product</th><th>Price</th><th>Add to Cart</th>
<td
class="left">'||c1.product_name||'</td>
div.demoCurrentOrder{float:left;width:38%;margin:16px
0 0 0; border-left: 1px solid #CCC; padding: 0 0 0 8px}
Similar to the Product section, you’re
assigning 38% width to the Current Order section. Border-left property creates
a vertical bar to the left of this section acting as a separator.
strong.demoTitle{font:bold
12px/16px Arial,sans-serif;display:block;padding: 4px 10px; background-color:
#DDD; border:
1px solid #CCC}
This rule applies to the PL/SQL code htp.p('<strong
class="demoTitle">P R O D U C T S</strong>') to display
the title “PRODUCTS” on top of table headings.
a.demoAddtoCart
{
display: block;
float: right;
padding: 2px
6px;
background-color:
#CCC;
color: #FFF;
text-decoration:
none;
-moz-border-radius:
4px;
-webkit-border-radius:
4px;}
This rule is pointing toward the anchor
tag in the PL/SQL code and applies rounded borders to the element.
<a
href="f?p=&APP_ID.:12:'||:app_session||':ADD:::P12_PRODUCT_ID:'||c1.product_id||'"
class="demoAddtoCart">Add ></a>
The -moz- prefix is used by Firefox while Chrome and Safari
require the prefix -webkit-. Change the border-radius value to 2 and then to 5
according to your browser and see the reflection on the Add > element.
a.demoAddtoCart:hover
{background-color: #80A2BB; color: #FFF}
The :hover is a CSS selector and is used
to select elements when you mouse over them. The :hover selector can be used on
all elements, not only on links. In CSS, selectors are patterns used to select
the element(s) you want to style. Change the background-color property to green, and move your mouse pointer over the Add> element. You should see the following
result.

</style>
This is the closing style tag.
In this tutorial, we learned how CSS is used in Oracle Application Express to position page elements. I left out some unnecessary rules mentioned in the book that were there for experimentation purposes.
Also see:


